
Is your room getting messy during quarantine? Or maybe you just want something… different?
Hi everyone!
Today we have a sort of a craft post. Yesterday wasn’t so hot so instead of actually swimming, I started to paint an old trellis my mom found in the shed the other day. I got to paint it yesterday and it was a great idea for…
Let’s back up.
A week ago or so, me and my family started to decorate our room. We got a bunk bed for the other girls and got to decorate some more. Since we had to move the beds around a bit, I had to take down my art wall.
My art wall was literally just above my bed… pictures stuck on the wall… with tape.
Taking it down was sad… and now my room was re-arranged so my art wall didn’t really fit.
THEN one day, (lol it was yesterday) my mom went in the shed and found an old trellis. “What’s that for?” I remember asking.
My mom suggested that I could paint it, and then hang my art on it! At first I didn’t know how my art would hang, but then there were these close pins that would clip my art to the trellis.
I was so happy! My art wall would stay up after all.
So let’s get the painting started! I took pictures on my camera as a documentary (sort of) so I could blog about it later. 
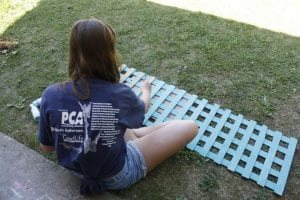
So here it is! I set up my little blanket on the grass and my handy dandy paints… now I’m ready to go! In the picture, I started using a light blue paint for the whole trellis. In my mind, I had absolutely no idea how the design would look in the end, but that’s the best part about painting: it’s that you don’t know what you will paint, but in the end, it mostly just all looks so beautiful. 
Here’s a more up close version.

Here is the overall paint I used to paint the whole trellis. It was called ‘deep turquoise’ and I got it at the local Green Bucks. (I think they have it at Dollarama also). My mom had to buy three of these!!!
After a few hours of painting in the grass.. ants crawling up my legs, I finally finished most of the painting. I decided to do the back sort of ‘weave’ first. So I painted that first and then decided to do the front ones. The original design was to do the trellis ombre, which is a transition of colours, fading into the next. In this case, I was going to do light blue into the deep blue. But, that didn’t work out and the colours looked…. choppy. So I painted over THAT and just decided to do it allll blue.
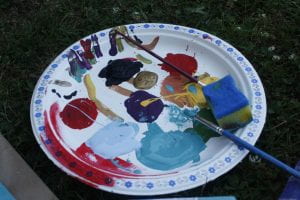
My paint pallet!!

Yeah so I didn’t actually end up doing the back. In my mind, I would of done that. Buut I thought that there was no point because it would be hanging on the wall anyways and the back wouldn’t even be showing that much. It was looking great so far!!

After short breaks of Netflix binges and Minecraft episodes…. I finished!! Well… right now it’s drying. But doesn’t it look awesome?! My mom was so excited. And I was, too!!
But I looked at it and thought:
Something’s missing…
But what?
So that was the big question. I couldn’t really have it only blue without an overall design.
I lay on the grass, thinking. The plants near my front porch breeze, and the flowers blow…
flowers.
So you can imagine what happened next: I decided to have some sort of ‘flower’ design on the trellis. But it was really difficult to draw flowers by hand, so I used the tip on the back of the paintbrush to make artistic flowers. Not realistic ones.

For this, the middle part of the tiny flowers that are going to be painted on the trellis, I used a ‘wild eggplant’ colour for the middle. (This is just like a deep purple)

For the petals, I used a really red paint that will really pop against the purple and the blue. I was originally going to use yellow, but my sisters where painting so it was… occupied. After I thought about it for a while, red didn’t seem like a bad colour for the petals!

So what did I actually do? So, I used the tip of the paintbrush to make little (very tiny, actually) purple dots on the front of the trellis. It looks like that!

Then I carefully use the red paint to make red dots around the purple ones, like this.

It’s not realistic… it’s an artistic flower, perfect for decoration! It looks really cute also. I love it so far!
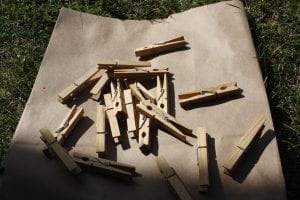
As I wait for my teeny flowers to dry, I gather the close pins around the house and decide that I’m going to paint them the same shade of blue (‘deep turquoise’) and one of those flowers on the front, so the whole set would match!

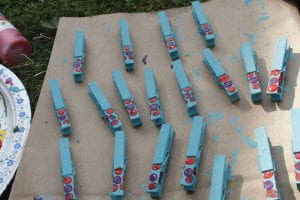
A while later I finish painting them (my fingers are literally blue… like, all blue.) It takes only about 6-10 minutes for them to dry in the sun!!
Painting these clips where hard, so the next time YOU somehow want to paints clothes pins, paint the front and the sides first, let them dry, then do a second coat from the bottom and the insides. Painting the insides is optional, (of course.) but I wanted the whole pin to be blue.


Later I paint the second coat. They’re drying!
Finally, they dry. Instead of using the back of the paint brush, I use a Q-tip to paint the purple dots in the middle, and the red dots for the petals. The flower turns out bigger than usual, but it still looks really pretty. And it matches! Now since I used more paint and it is originally going to be ‘glopier’ becuase I used a Q-Tip, it will need more time to dry.

Now we’re finished! I hope you guys liked this homemade D.I.Y that I made to hang my art on!

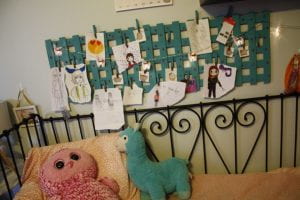
So as you can see here the process of putting the art on is very simple: all you have to do is clip the pin on the trellis, and then put your art on with it!! (also.. this isn’t only for art!! You can make it to be for special numbers, invitations… whatever! I think it as a cooler version of a cork board. More decorated.)
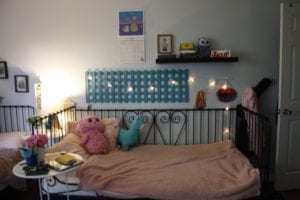
Yay it fits!! It also looks pretty cool with the room. I have this llama, called llama J-j (I was (and still am!) obsessed with llamas) You can see llama j-j in the picture. The llama is also almost the same colour as the trellis, so it really matches!
And here it is with my art!! Ta daaaa! It looks great and I’m so proud of how I painted it. I’m glad I got crafty and painted this, better than buying one at the store! It’s personalized, and it also makes as a great boredom buster. Painting it takes a quite of bit of time!
I hope you guys liked this post, I had fun painting it and I thought it would be cool to make a post about it. Just for ideas, and if you really want to, why don’t you add something that YOU made yourself to your room? It doesn’t have to be a trellis. My dad is building a deck near the pool (photos will be posted in photo log #13) and he had some extra wood left off, so my sisters painted it for paintings in their side of the room!:

(This is one my mom painted)


Natalia also painted some rocks for the garden!
Here are some more crafts me and my sisters painted and made to decorate our room!:

Here’s something Suzanna made. She found this big stick and painted it, then we bought these cheap wind chimes (at green bucks) and these cute wood animals that she painted. Then my mom put string and attached it to the stick! Boom.

Here’s the one Karina made. She had an owl cut out and a little birdhouse to paint!! Her stick she painted was ‘outer space’. And then she had a unicorn with a rainbow wind chime!

This is a box I painted, just out of boredom! It looks great though, and I worked really hard on it!
So get creative! Bust that boredom. It’s exciting sometimes to just sit (without a device) and see what comes to you. More posts coming soon! I hope you enjoyed this one. Keep writing!
Julia ❤✌
I like this idea!! It’s so creative, and it adds the aesthetic vibe to your room! Great work!
thank you!